A few fun projects I have completed recently…
Sony “PiStation” Desktop Retro Video Game Console

About this Project: I have made several desktop “mini” game consoles using the Raspberry Pi Zero and Raspberry Pi 3b computers over the last couple years. Some of the cases I’ve picked up from resellers on Etsy who have designed and 3d printed their own cases in various styles and others I’ve purchased through RetroFlag, who make some very high quality 8-bit and 16-bit cases and wired controllers. With the release of the Raspberry Pi 4b and its ability to run Sony PSP, Sega Dreamcast, and other higher powered consoles, I wanted to build myself the ultimate retro games console.
I have had a Sony Playstation Classic laying around my house for the past year or more and I’ve only plugged it in and fired it up twice. I was only interested in playing Final Fantasy VII, but with the game’s release now available on the Nintendo Switch and the lack of wireless controller support without the purchase of an adapter, I decided that while the Mini PS1 case looked great, the internals of the system were truly lacking and I thought I could do better by replacing the guts with a Raspberry Pi 4.
I’ve seen some example videos on YouTube where other Raspberry Pi hobbyists have cut a Pi 3 down to size by eliminating the Ethernet and USB ports and then used the original PS1 Classic board to tap into the circuitry for the buttons, LED light, and USB ports. I studied this method and ultimately thought I could fit a Pi 4b in the PS Classic case and use off the shelf components to wire everything up without having to damage the Raspberry Pi or doing any soldering.
While this was a nice goal, once I started digging into the project, I found that no off-the-shelf USB cables, HDMI adapters (the Pi 4 uses micro HDMI and you must have an adapter), or USB C extension cables (the Pi 4 uses USB C for power, not micro USB like previous generations) have enough slack in the cable or the connectors to fit into the case alongside the Pi computer. I ended up having to do some additional cutting and sanding of the PlayStation Classic case to accommodate access to the USB C and HDMI ports. I also had to create my own USB cables for the front of the PS1 Classic ‘controller ports’.
In addition, I also created a custom LED light and mounted it where the original Sony logic board LED was to provide a green status indicator light as a nice touch to making the case look as professional as possible. I also created a custom power button that aligned with the power button on the PS Classic case so I can turn the system on/off using the original power button. I installed a safe shutdown script on the Pi so when you press the button it will power down the OS immediately.
Along with the safe shutdown script, I made some professional looking customizations to the RetroPie image that included hiding the Linux boot text, Linux shutdown text, a custom splash screen video that mimics the original Sony and PlayStation boot sequence (courtesy of Eugene S via YouTube) and hid the RetroPie run command so that when you launch a new game it doesn’t prompt you to make any special video or resolution customizations. I also overclocked the Pi 4 to 1.75 GHz and included a full SoC heatsink and fan for cooling purposes. I had initially overclocked it to 2.0 GHz but found the heat the chip generated at rest was concerning inside the Sony PlayStation Classic case and the performance difference I was getting between 1.75 and 2.0 was negligible so I down clocked the system and shaved several degrees off the thermal CPU and GPU cores.
I installed emulators for the following classic console systems:
- Nintendo Entertainment System
- Nintendo Game Boy Advance
- Super Nintendo Entertainment System
- Sega Genesis
- Nintendo 64
- Sony PlayStation
- Sony PSP (PlayStation Portable)
- Sega Saturn
- Sega Dreamcast
Most of the systems play at 1080p, with the following exceptions. PSP (720p), PlayStation (720p), Nintendo 64 (480p), Saturn (480p), and Dreamcast (720p). Performance on all but a handful of systems are very playable with most games. The exceptions include the Nintendo 64, Sega Saturn, and Sega Dreamcast emulators; all of which are still very much in the experimental phase. The Saturn performance is currently close to playable for a few games (Panzer Dragoon II, Sega Rally) and totally unplayable (NiGHTS) for others. I am hopeful that additional optimizations to the Saturn emulator will improve performance over time.
If you are interested in building a PiStation, Mini NES, Mini SNES or more, checkout the links below for documentation that I used in building my system.


Gameboy Zero

About this Project: I found a really cool project online at sudomod.com where you could convert an old 1989 Nintendo Gameboy into an updated color model using an Raspberry Pi Zero and RetroArch Linux distribution emulator. After a lot of soldering (and swearing) I was able to piece together my first GBZero. Thanks to the great community that evolved around the sudomod website and Wiki, there were a number of new technologies like an integrated circuit board and expanded after-market parts to make the construction less difficult. I ended up making a handful of additional ones as well as a few Raspberry Pi 3b model mini N64s and mini SNES consoles.


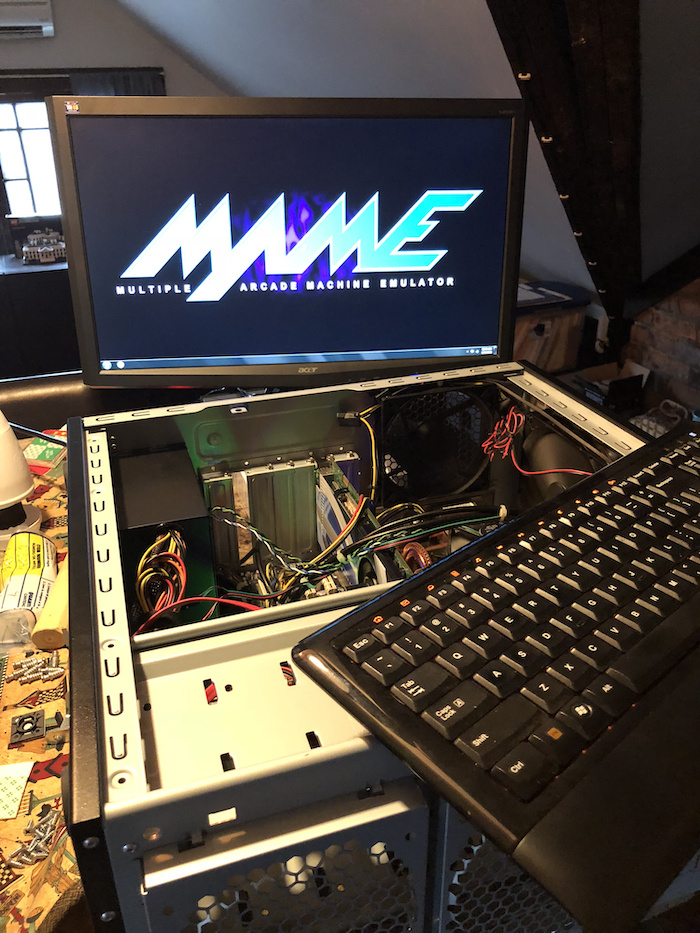
Home Arcade Machine Cabinet

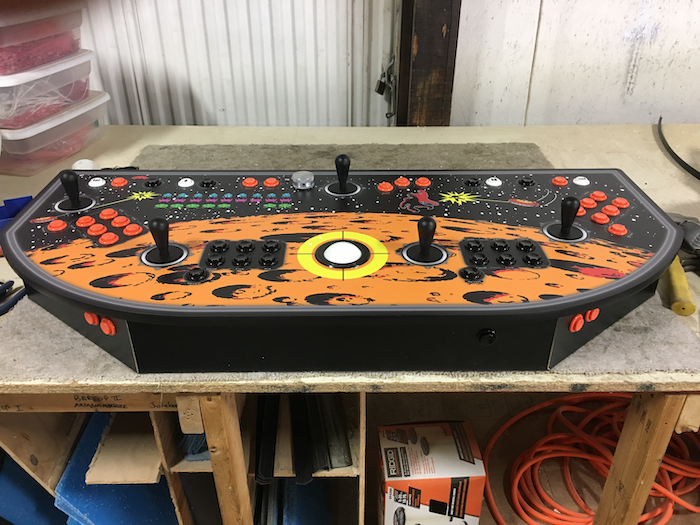
About This Project: I have always wanted my own arcade machine. In 2010, I purchased a vintage Ms. Pac Man machine via eBay but in 2015 I moved to a new house and the Ms. Pac Man machine couldn’t be relocated along with me. This gave me the possibility of designing my own MAME (Multiple Arcade Machine Emulator) machine that would replace Ms. Pac Man and added 179 more games to the mix. I found a great solution for building the cabinet with North Coast Customs. They have a multitude of cabinet styles to choose from and they shipped to my home in flat boxes allowing me to assemble the cabinet in place. The photos below detail the step-by-step construction of the cabinet. I used HyperSpin as the front end for loading the games and my wife created a great high score board for tracking some of our favorite games (and family rivalries) aka various “bar-cades” around town like 16-Bit and Arcade Legacy.